Custom Display Cabinets, Part 2 -Construction:
Having figured out what you want them to look like and what they are to be made of, Here is HOW-TO actually build them!
JOINERY
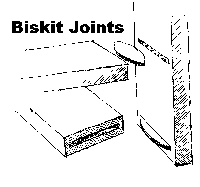
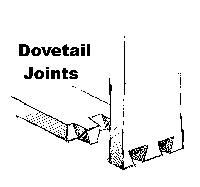
Joinery is nothing more then the joints 'tween one piece of wood and another. Let's suppose that you have decided that 1 x 4’s are going to be deep enough and you know just exactly where you want the standards, (vertical), and shelves, (horizontal), to go. Your next decision has to do with joinery, (the putting-together of it all.) Have a look at the sketches of possible joints.
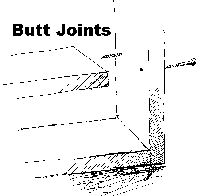 A butt joint is the simplest and easiest to finish, but it’s not very strong.
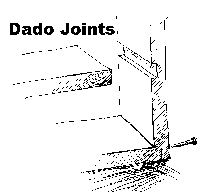
Dadoes are stronger but harder to make and are tricky to finish.
Biscuit wafers are a nice compromise, but not all carpenters have the tools to make this joint.
Dovetails are the strongest and simply the most elegant, but you had better have a first rate carpenter lined up and be prepared to pay for lots of fussy labor. (And if you know how to dovetail joints, why are you spending time reading this article when you should be in your shop building your wife her cases?)
I wouldn’t bother with mitered joints on anything deeper then a 4"display case.
If you want to have the opportunity to adjust your shelves, there are dozens of ways to achieve this end, anything from simply drilling a bunch of holes in your standards and using 1/4 inch hardwood dowel-pins to holdup the shelves. The other extreme would be to use some book case hardware system in your display case. If you go this route, please make sure that your standards are good and strong as they will be holding all the weight. (Ordinarily, the shelves are attached to the case back for strength. See below.)
Your decision as to joinery probably will be influenced by whomever is going to do the work, but it needs to be said that nearly anyone who is willing to take their time and make a few mistakes -practice runs, - ought to be able to put together a case of some sort. For example, if you were to find some very well weathered wood, and take a wire brush to it with a little elbow grease, your beginner’s joinery might be just the ticket. Provided your collection, (and your home), appreciate a rustic look. You might even pass your case off as an antique itself. A dark stain covers a multitude of sins. (See FINISHING below.)
Take advantage of the cutting services they offer at the home center stores. Get them to cut your boards and particularly, get them to cut the case’s back on their panel saw. In this way, you can be assured you are getting perfect right-angles so your doors will fit correctly. (It's also easier to get it into your car.)
Make sure you get what you want in terms of numbers of pieces and get them at the dimensions you want. $0.25 to $0.50 per cut is cheaper then buying a power saw, and trust me, it’s cheaper than your time spent doing it by hand. Make a nuisance of yourself if you have to. You might be wise not to do your shopping on a weekend however.
ASSEMBLY:
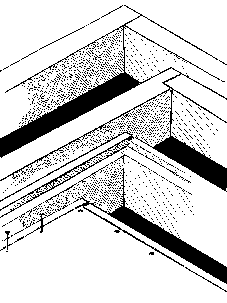 This picture shows a series of steps to make rabbit joints -a kind of a dado joint that happens at the end or edge of a board. I must stress that you MUST allow for the depth of the rabbit when you figure the length of your board. Look closely at the picture and you will see that the board that comes into the joint from the right side is actually longer then the distance between the two boards that it separates. The depth of the case itself is also reduced by the depth of the rabbit that houses the back of the case. It is important that the back is nailed to the edges of the case AND the various shelves because you use the back to attach the whole display case to the wall.
Corner Joints . . . . . . Use a nail set if you are nailing things together and then go back and putty the holes. Using screws? I like screws -especially sheetrock screws. I use them for everything. It's no big deal to countersink them and fill the holes with wood plugs (for the high-end stuff) or spackle of some sort. But then again -why bother -are the heads all that unattractive? Will they really show?
FINISHING:
If you order doors unfinished, you will obviously need to finish them yourself, and it would be good if they matched the display case, but it's not necessary to exactly duplicate the case. Do your finishing in the garage -or off the wall anyway, and take your time. While on the subject of time, give it all at least twice as long to dry as the instructions say. You might get advice from the guys that sold you the doors as how best to finish the doors and your case. It's also possible that they would sell you some of the same finish the factory used, but not likely because the factory probably used a spray system of some sort. Remember -the doors cover the case so don't get all carried away. The doors are for show and the case is for dough -to paraphrase the golfers. See my thoughts in "Fast and Easy Finishing". If your joinery is a little rough, make lemonade, -or use putty -don't matter -it's behind the doors. If you are going for a real rustic look, use a wire brush to give doors and case an appropriate patina. I love faux finishing and like to use a sheet of home-made faux finished paper sort of like wallpaper on cases. This approach will cover a huge multitude of sins and armature carpentry, and if your work is really rough -it helps hold it all together too!
INSTALLATION:
Nailing the thing to your walls is perhaps the most important step. Do it right or you might come home to find your collection of antique china is on the floor and now it's a collection of pretty little ceramic bits and pieces. This might be funny to someone who doesn't appreciate antique china, but if there is a small child under the case when it comes down, it stops being funny in a big hurry. DO IT RIGHT. If you don't know how to do it right, find someone who does. Read my atrical on Hiring Carpenters. If there is any doubt about the strength of the whole thing -use 1/4 inch hardboard for your backing rather then 1/8 inch. Drive your fasteners in to studs. If it takes some time to find these studs, and involves poking a few holes in you sheetrock, so be it. I like screws but nails are just as strong. The nails don't come out as easily, but both are tremendously strong in sheer. Stronger -in fact- then the case back. This means to drive more fasteners. Not quite sure you caught a stud on those 2 screws on the right? Drive a few more. If you just can't find studs, use hollow-wall anchors, but use them right and use a lot of them For a real belt & suspenders approach, or an extra heavy / valuable collection, consider using cleats under the shelves. For the strongest cleats, use 1 x 2's. For something a little more attractive but not as strong, use molding or trim of some sort. Drive screws or nails through these cleats and through the case-back and into studs. Do it right, and you can use the thing as a ladder if you want to. I go into the subject of the careful and effective means of hanging things in my article How To Hang Things CORRECTLY
HANGING DOORS:Given the many many types of hinges, it's hard for me to offer specific advice. Wish I could. Hanging doors of any sort is as much art as it is science. In general, I'd suggest:
|